Ansible, a powerful open-source automation tool, has gained significant popularity due to its simplicity, scalability, and agentless nature. Whether you’re a seasoned DevOps engineer or a curious beginner, setting up an efficient development environment can significantly enhance your experience in coding in Ansible.
Setting up an Ansible development environment is highly personalized, as it varies significantly based on individual preferences and requirements. While there are various approaches to setting up such an environment, this article will focus on utilizing Visual Studio Code (VS Code) as the primary editor. While it’s important to note that the specifics of your setup may differ, this article will serve as a starting point in your journey of Ansible development with the aid of Visual Studio Code. Let’s dive in and discover how you can enhance your Ansible workflow and elevate your automation skills to new heights.
Setting up VS Code
Having Git installed on your system is essential for this Ansible development environment setup. It is a fundamental requirement since maintaining your Ansible code in a source control system is crucial. Integrating VS Code and Git eliminates switching between tools for pushing or pulling your Ansible repositories.
Once you have successfully installed both VS Code and Git, the next step is to equip your VS Code environment with the necessary extensions. These extensions play a crucial role in enhancing your Ansible development experience.
Here is a list of recommended extensions that you should install:
- Ansible: This extension provides rich language support for Ansible, including syntax highlighting, code snippets, and IntelliSense, enabling you to write Ansible playbooks with ease.
- GitLens: GitLens supercharges your Git capabilities within VS Code, allowing you to explore Git repositories, view file blame annotations, and gain deeper insights into code authorship and changes.
- YAML: The YAML extension offers improved YAML language support, facilitating the creation and editing of YAML files used extensively in Ansible playbooks and configurations.
- WSL (Windows Subsystem for Linux): If you are using Windows, installing the WSL extension will enable seamless integration between VS Code and your WSL distribution.
- Remote - SSH: If you are developing Ansible playbooks on remote servers, the Remote - SSH extension allows you to securely connect to and edit files on those servers directly from within VS Code.
Installing these extensions directly in VS Code can enhance your development environment, ensuring you have the tools for seamless Ansible development.
Determine where you will install Ansible
The VS Code Ansible extension relies on an installed instance of Ansible to access documentation and linting information. Because of this, we must determine the preferred location for installing Ansible. Using Linux or macOS, you can install Ansible directly on your local machine. In this case, you can utilize Ansible locally without the remote connection plugins mentioned before.
However, if you choose not to install Ansible locally or are operating on Windows, you must establish a remote connection to the location where you install Ansible. For this purpose, the Remote-SSH and WSL plugins mentioned earlier become relevant, providing the means to connect to one of these options using VS Code.
Tools to install The main tools we need to install on our local or remote environment are Ansible, ansible-lint, and any collections you will use in your development.
I will be using WSL on Windows as an example of how to set up and configure VS Code with Ansible and ansible-lint. Install Ansible, ansible-lint, and any collections you use to develop on the WSL instance. I recommend installing the latest Ubuntu WSL instance to get the latest version of Ansible that you can (in my case, Ubuntu 22.04 and Ansible ver 2.10.8). I also recommend using the package manager, in this case apt, to do the installation.
If you prefer, you can install Ansible using pip instead of the package manager. Just know you may have to change some settings with the Ansible extension to add the correct paths for the Ansible and ansible-lint executables.
Connecting VS Code to our environment
If you have installed the WSL extension in VS Code, you can click in the lower left this symbol:

That will bring up a drop-down with a list of options. The one we want is either:
Connect to WSL
if you have one instance or
Connect to WSL using Distro… (and select your distro)
if you have multiple WSLs on your system and want to connect to a specific one.
When connected, go to the extensions tab, and click Install in WSL on the Ansible, YAML, and Gitlens extensions. Below is an example of what I see in the Ansible extension with my particular version of WSL:

Once installed on WSL, the Ansible extension should detect our previously installed tools. If not auto-detected or if you installed Ansible to a non-typical path (like by pip), the Ansible extension allows entry of paths to the executables for Ansible and Ansible Lint on the remote systems.
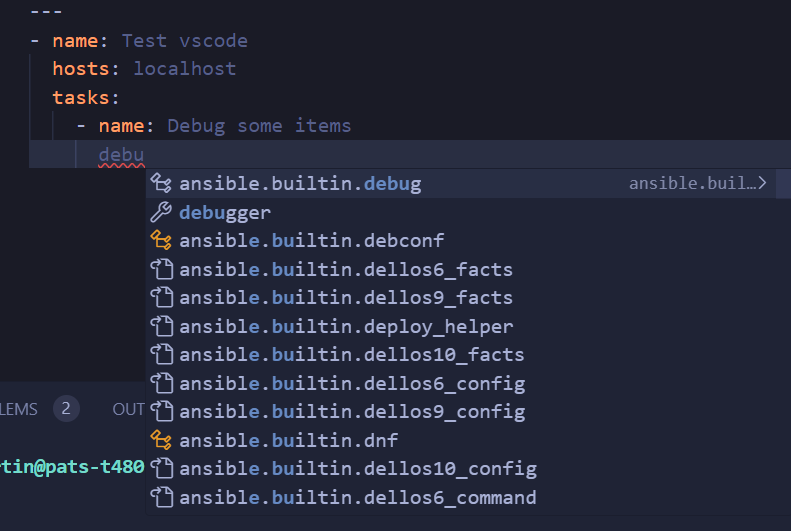
Once VS Code detects the Ansible installation, it will also see any collections installed on the system and be able to do autocomplete as Ansible playbook and role development happens. You should see the file type at the bottom as Ansible instead of just plain YAML.

You should now see autocompletion working.

Setting up an efficient Ansible development environment using Visual Studio Code can greatly enhance your ease of working with Ansible. You can now leverage the power of Ansible within the familiar interface of VS Code. Happy coding!
Notes: Additional tools can be installed and used by the VS Code ansible extension, such as ansible-builder and ansible-navigator. These will require the machine you are connecting to be able to run containers. In future articles, I will feature some of these tools and how to use them in our development environment.
References and further reading:
Deep Dive on Ansible VS Code Extension: https://www.ansible.com/blog/deep-dive-on-ansible-vscode-extension